Why Your Print Lab Is So Important

I welcome you to please share the link in order to share the information and images found here, but please do not copy or save my photos. Thank you. You may also pin it on Pinterest using the Pin It button here …
You’ve just finished the perfect session … the lighting was perfect, your clients were amazing to work with, the location and the props you lovingly selected with care were all fabulous. You feel giddy with the excitement of opening those images and seeing the art you captured. You next spend time carefully processing the images to perfection, making sure the color is perfect, the amount of contrast just right right, the details and clarity are spot on. Your clients view their proofs, oohing and ahhing the whole time … did you even see a tear or two in there? Everything is perfect … now who do you trust to print those images that you poured your heart and soul (not to mention time and money) into?
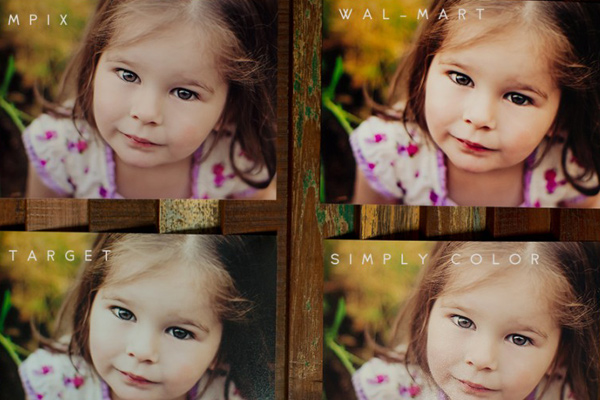
I don’t know about you, but after all that work bringing your photography and vision to fruition, the final product is a step that is of the utmost importance. I have been wanting to do a little demonstration for a while now, sending the same image to different labs and comparing the differences. I initially sent the image to a half dozen different chain/big box type print labs all over our town, but after viewing them I decided to not use most of them for this demonstration because they were all the same. And by the same, I mean both mediocre and wildly different. What?! Bear with me here. Sending your prints to non-pro labs is going to leave you with not only sub-par quality prints, but inconsistent results. The technician running the machine, the calibration of the printer, etc. are all going to influence your final prints. So, what may have come back from Wal-Mart with too strong contrast and a yellow cast one week will look drastically different the next. It’s a coin toss … washed out and blue?? Cyan and blown highlights?? But whatever the results, as inconsistent as they may be, you can count on the quality being inferior to that of a pro lab (or for non pros, MPIX).
I’ve decided to a fairly non-scientific study to compare print quality among several chain labs and my preferred pro lab. This is just to give you a general sense of the drastically different prints non-pro labs will produce, and to compare the quality difference between them and a pro lab. Even in this uncontrolled setting (I laid the images out in natural light, kept the settings the same from image to image and applied no processing after uploading beyond resizing for web in order to keep the playing field as level as possible), the quality difference is apparent.


For those interested in viewing the original, unedited image you can view it here.

Note that the Simply Color sample is printed on the luster paper as most of the other examples are shown (a few of the labs didn’t have any option available beyond the glossy paper). The Simply Color luster paper print is shown inside the album that I speak of below (I use it in my studio to show clients the different types of paper available for prints). It has a thin black border around the image.


And a second sample …

To see this before shot and recipe view here.

Some key points when preparing your images for print.
Calibrate!!
Always do your editing on a calibrated monitor. There is simply no other way to be certain that what you see on your screen is what you will see when your images are printed. This should be done well before you ever start processing your images. I recommend and use the Xrite EODIS3 i1Display Pro.A less expensive alternative is the Xrite CMUNDIS ColorMunki Display1. Keep in mind that there are other steps beyond the monitor calibration process that you’ll need to have done correctly in order to get accurate screen to print color in your images. These include using color profiles correctly (use the color profile recommended by your lab), soft-proofing (ask your lab if they have a soft-proofing profile available and use it) and having appropriate lighting when editing and viewing your images. I know each of these things are big subjects in themselves, but I’m trying to keep this on the simple side and will touch on these subjects in future posts with more in-depth detail.
Color Space, Soft Proofing, File Type and Size
Always refer to your lab before preparing images and uploading. They will have guidelines for color space (which will usually be sRGB or Adobe 1998 RGB – however check with your specific lab as many have their own profiles to use), file type (such as JPEG max quality, TIFF, etc), sizing, resolution, etc. Ask for a soft proofing profile which you can use to view exactly what your prints will look like when printed on their machines (as long as you are calibrated, that is). I like to leave my resolution unchanged in order to leave as much pixel data as possible – the only thing I do is crop if needed for the print’s aspect ratio (see here for details and how to’s), leaving the resolution blank (which leaves my image resolution as it is). But again, check with your lab to make sure you are preparing the files as they need them. Also, be sure to choose NO color/auto correction, especially if you are calibrated and have meticulously processed your image for perfect color – this will guarantee you get not only accurate but consistent results (when working with a reputable pro quality lab).
Sharpen
Sharpen your images for print, zooming in to 100% view to see the actual results. Keep in mind that viewing web sharpening and viewing print sharpening are two different things. I frequently get asked why web images look so much crisper after sharpening versus higher resolution images. What you see in a web size version image will look more dramatic and crisp because you are viewing the image at 100% … to see the actual results and difference in a sharpening action in a full size, high res image I encourage users to zoom in to 100% to see the actual results. 🙂 So apply your sharpening action (after your final crop), zoom in to 100% view (hit command or control + 1) and then toggle the sharpen layer(s) on and off to see the difference. 🙂 Because you usually can’t view the high res image in it’s entirety at 100% size, you won’t be able to see the actual results over the entire image until it’s printed. So, zoom and toggle!
Order sample prints
Almost any pro lab (and MPIX as well) will give you a few test prints for free when you register an account with them. This will allow you to double check your final prints. I strongly recommend doing this before sending any client work to a new lab for print. I choose the option of having a sample Fine Art Album created by Simply Color Lab so I could have an album of examples showing the different types of papers offered by my lab to clients. Most labs will offer a swatch book of samples for free, but I think it holds more value for clients to see your own work in the samples and have them sized large enough to really get a sense of how the different paper options affect the image.

I get this question a lot, so while attempting to not sound like a commercial (the idea to have this extra little bonus came after the fact) I wanted to take a quick minute to explain why after trying numerous other professional labs, I choose to use Simply Color Lab and their sister company Simply Canvas as my go to lab for my clients print and canvas orders.
When clients hire a professional photographer the expectation is they’ll be getting professional images and this goes beyond what we capture. As a professional we should be expected to not only know how to capture a fantastic image, but we are also responsible to make that image is the best it can be. If we’ve done our job, the images we capture will be hung proudly on walls and will be displayed for the world to see. I know when I put my name and reputation on my work I want it to be the best it can be? Whether a small print or a giant canvas, simply put, they help me deliver the best possible product to my clients.
Over the years I have tried numerous labs and hands down have been the most pleased with Simply Color Lab and Simply Canvas. Not only are their products outstanding, but their customer service (something that I place extreme value in) is amazing. They make ordering prints FUN.
Note: Simply Color Lab is a lab for professional photographers. For non-pros I recommend MPIX. 🙂

Annie – Can you tell us how often you calibrate?
Usually once every week or two weeks. 🙂 The software I use with my device automatically pops up and reminds me when it’s time … sometimes I’m bad and if I’m in the middle of something I’ll tell it to be quiet, LOL – that’s the only reason why it would be longer than every week.
I love the post! I tried to register on their website but it asked for company name and Tax ID information. Do you have to be a professional to use their services? I am not a professional but I would like professional quality on the prints I work so hard to perfect. I normally use Target but after reading this post I will not use them again.
If you must be a tax paying professional photographer, do you have any recommendations for print shops that anyone can use? Thanks 🙂
Jamie … Yes, Simply Color Lab is for professional photographers, and I recommend MPIX for non pro photographers. 🙂
I use White House Custom Color and while I charge for my services I don’t have a tax ID number because I’m still so small that I’m not even breaking even yet. They didn’t require a #… so maybe if she wants professional quality prints she could use them? What do you think of that lab? I’ve been pretty happy with their results.
Your timing on this couldn’t be better! I just downloaded and used your free facebook action yesterday and was freaking out last night because my full resolution images are nowhere near as crips and clear as your action made it! Thanks for clearing up why! And I am definately off to check out Simply Color!
I am having problems registering for the giveway on facebook. I enter my email address and hit “submit” but nothing seems to happen.
Any suggestions?
So sorry, Jennifer! Could you try a different browser perhaps?
Great article, I have been a bad girl and not used a calibration tool at all. I have a brand new monitor and will definately be taking your advice!
already a fan of both!!!
Annie, this is exactly the info I love to hear! Thanks so much for taking the time to share your knowledge!
Love this post. I usually use WHCC, but I’m going to check out simply color, because it looks like they do great work.
Jamie – labs like this are meant for professional photographers, however I always tell my clients to print at mpix.com for a pretty good quality image… it’ll definitely be far better than printing at target or walmart 🙂
Thank you! Thank you !! Thank you!!!
This is just what I have been looking for……I have to take the plunge and order better prints. I keep ordering from a local store and they are just horrible. They don’t look like they do on my computer.
I have been considering calibrating.. I love my lab, but have registered with Simply color too and will give them a try!
i definately need to get that software, i’ve been putting it off b/c my prints seem fine. After reading this, i am going to purchase asap! my question is…what do i do about all the photos i have done previously? when i install calibration software, is there a simple step to make sure all my other photo files can be calibrated as well? just wondering, i googled it and could not find an answer.
H, Sarah! The calibration systems are both hardware (it looks like a little mouse or hockey puck that hangs down and suction cups to your monitor’s screen) and software that work together. It calibrates your monitor to make sure your screen is showing you accurate colors. So, it’s not doing anything to your images. The change would be in the way you are viewing the images … so, if your monitor is uncalibrated and showing you a strong blue cast, for instance, you would likely be correcting/editing them to compensate for that by adding a lot of yellow. After calibrating your monitor it will show accurate color – so that blue cast in this example would be gone, and, therefore any images you edited with that inaccurate display would probably be way too yellow (because you had added yellow to make up for the overly blue cast from the uncalibrated monitor). Does that make sense?? LOL! So, you may want to go back through and check your images to see if they need color correction – that is up to you. After calibrating it will show you the before and after so you can see just how off the color was.
thanks so much for posting this, great information!
could you tell me which of simply color’s prints your using? i see several options, they have new vivid prints, and then fine art digital paper with several different options.. feeling a little overwhelmed, but i’d love to give them a try! i’m guessing the traditional fine art paper, but wanted to make sure.. thanks so much!!
Hi, Hope. It just depends on what the client is ordering. Some order the fine art papers, and now with the new Simply Vivid prints we have a new choice. For standard prints it’s the luster paper. If you order a free marketing kit from Simply Color you’ll receive a small swatch book showing all the different choices in papers. And I highly suggest getting a sample Fine Art Album that will display large images of yours printed on each of the papers they offer. For prints that will be framed, the luster finish is usually my selection for my own work. If having an album created, the fine art papers are just gorgeous. They have SO many beautiful selections! It’s definitely a personal choice – and having the album for your clients to browse through is what I recommend (or at least order the marketing kit with the small swatch samples).
Thanks so much for always posting such helpful information. I have been following your site for about a year and I love your actions.
Thank you so much for this great post! I have had the hardest time figuring this stuff out. I have not been able to find answers to my questions even in books. I just had some photos printed and about 6 of them had texture added, and they were almost unrecognizable. My heart sunk 🙁
Annie, I’m confused as to what color profile should I use when editing if I want to print the final product. Can I just use sRGB or do I have to use Adobe RGB?
Check with your lab, Sarah. Most all labs accept and want sRGB. However, a few will accept Adobe RGB … BUT make sure that if you are editing and saving as Adobe RGB that your printer actually prints in sRGB, otherwise they are simply taking that Adobe RGB file and converting to sRGB at print time – so there would be no benefit to working with the (wider gamut) Adobe profile. And you wouldn’t see any color shifts on your screen, you would just be leaving it up to the printer to convert and print. 🙂
Great info! I’ve been using Mpix- definitely going to check out Simply Color now! Great timing on the article, I’m about to get the files from my wedding!
thanks for getting back to my question! Professional photography is in my future but right now im just having fun capturing my wee ones growing! I will DeFINITELY check out mpix!!
Oh my! Thank you for this, Annie. Very informative. And very much appreciated.
just wanted to say thanks for responding to my question, much appreciated!!
This is incredible. The difference a great printing company makes!
This post is great! Love seeing the difference between the labs, really opens your eyes.
Thanks for the informative article. Your comparison shots really illustrate the difference in prints. Thanks so much for the chance to win the fab package too.
I’m already a fan of both and I also use Simply Color Lab (their canvas printing is the best that I’ve found). : )
I love this post! I have been thinking to do this now that we have gone pro (my daughter and I) for our clients to see the difference. I just tried Simply Color’s Vivid prints and love them. I am now getting ready to order studio samples so I am comparing professional printers as well. There are so many ways to print and mount images, if I am overwhelmed my client will certainly be if I don’t get that clear in my order presentation! Thank you for sharing your knowledge.
Thanks for the great article! I downloaded Simply Color Labs profiles and when I soft proof with simulate paper color turned on there is a strong blue cast. I’m working on a calibrated monitor and have found Mpix’s profile to be quite close with this option. Can you tell me from your experience if the Simply Color luster prints more closely match what you see with or without the simulated paper color? Thanks!
Annie!!! I’ve said it before but I’m going to say it again.. you are AMAZING!!! I LOVE all the information you share with us. I can’t believe the difference in all the shots. I’m from Australia, but will DEFINATELY use your tips to find a FABULOUS lab to print my shots. Oohh.. and I’ve been playing with your Faux Flare action.. OMG!!! SO in LOVE with it. I was going to put a photo on your FB Page, but I’m not sure it’s worthy.
Thankyou again!!
xx Sarah
xxx
When I entered the giveaway and hit like the lab, my browser went nuts and it just kept blinking! And I had to restart, so I had to go like the page on my own but I’m also worried about why it did all the blinking. So will my entry count and is this normal?
GAH!!! I was so happy with MPIX until I saw this. lol. MPIX is great, but that looks like a HUGE difference in clarity! Question though. Right now, I have my website with Zenfolio. , My customers love that they can order through my website, and I love the slideshow feature. Does Simply Color participate in anything like this? Thank you so much for passing all your wisdom along to us!
Thanks for the information i love mpix….got my first photo lab by them 1 week ago….
Thanks for this uber-helpful post! I shared with my FB Fans, because THIS is why I give lab recommendations to my clients.