Photoshop Actions | Paint the Moon Studio Spotlight {Photography Set Up}

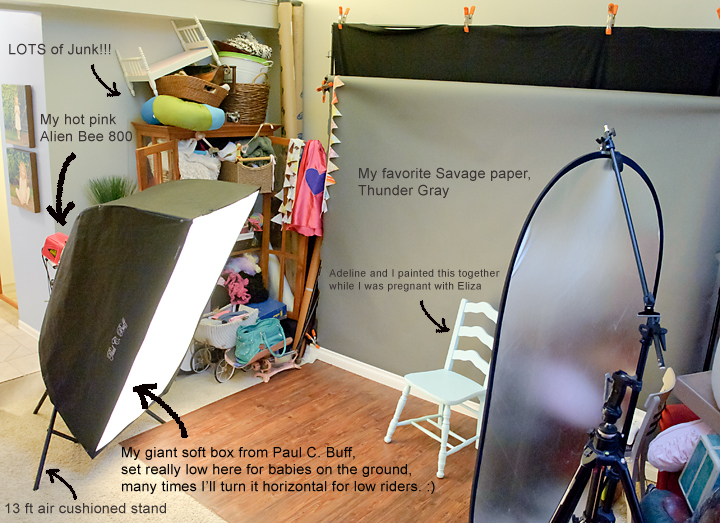
So, here it is, the tiny little place where my kids and my clients squeeze into for studio images. It is humble, it is messy and unorganized and it is a very simple set up. One of the most simple set ups you can have while shooting professionally in a studio setting. I’ve had many requests over the past couple years for more information and pull back shots, and have fielded a ton of questions about what gear I use and how I do things. Since I’d like to answer everyone’s requests for more information, I’m going to break this little feature into a series of posts, this being the first. Today I will cover just the basics for my set up and show you the mess that lurks in the corners.
Please note: I *adore* glorious, natural light and always, always prefer natural to a studio setting. And, in fact, I swore I would never shoot with any kind of lights for years … scoffing at anything that wasn’t beautiful, natural light. However, I do live in the Pacific NW and we have long, rainy and DARK winters which make photography in the winter months pretty near impossible most days. I’m all for roughing it and getting out in the cold and wind to take photos – but when it’s also pouring rain in addition to being dark and freezing, it makes it not just miserable (especially for little ones and babies), but darn near impossible. So, the studio was born out of necessity and an intense longing for some photo opportunities during those dark winter days. I haven’t actually set foot in the studio – which has become a dumping ground for props over the summer – since last spring when we saw our first few days of sunshine and warmth. However, the looming darkness and rain are setting in here already, so soon I’ll be dusting things off in preparation for being studio bound once again.
Prime Location
The first thing you may notice is this is smack dab in the middle of our home. I like to think of it as an ever present reminder of how much my husband loves me ? we no longer have a living room, we have a photo studio. Add that to the fact that I also convinced him many years ago to ditch our dining room in favor of a girl’s playroom and you are looking at one very patient and supportive guy.
Space, What Space?
You may think you need a huge studio space and lots of fancy gear, but in all actuality, what is important is that you have the “right” gear and setup. Ideally, this space should be bigger. Width wise, I’m doing fine, but I would love to have more breathing room when stepping back to take a photo. Now that I’m using a full frame camera (Nikon D700 … “What’s In My Bag” feature coming soon), it’s not so bad. However, when I was shooting with a cropped sensor (Nikon D300), it was absolutely too tight in there. In the studio is the only place I ever touch a zoom lens … I love my primes, but because I can’t shoot wide open to get that lovely bokeh that is my trademark look while using studio lights (more on that below) and the Nikon 24-70mm 2.8 is a tack sharp lens, I end up primarily using the 24-70 for studio work (with a cropped sensor you would need to zoom out pretty far still). The width of the room (from my background wall to the opposite wall with canvases) is 13 feet. Since you want your subject pulled off the background at least 6 to 8 feet, this makes shooting in there very, very tight. Most of the time I am shooting with subjects closer than they should be to the background and watching carefully for undesirable shadows that can be the result of a subject too close to your background.
Settings
My prime lenses are my babies … the 85mm 1.4G is rarely off my camera, except in the studio. Because I shoot with strobes (more on what I use below), I can’t shoot with a shallow depth of field like I usually do with my primes. My shutter sync speed is about 1/250 second. Any faster shutter speed and I’ll get a curtain shadow. In order to shoot at the widest aperture possible, I have my light’s power turned down ALL the way and my shutter speed as high as it can go (the 1/250 second I just mentioned). This usually puts my settings around 1/250 sec, ISO 200, f4.5. With my D700 in the studio I will also use the 35mm 1.4G, sometimes my 85mm 1.4G, and for macro work like shots of precious baby details, I’ll use my 105mm f2.8G Macro lens (I use only Nikon lenses).
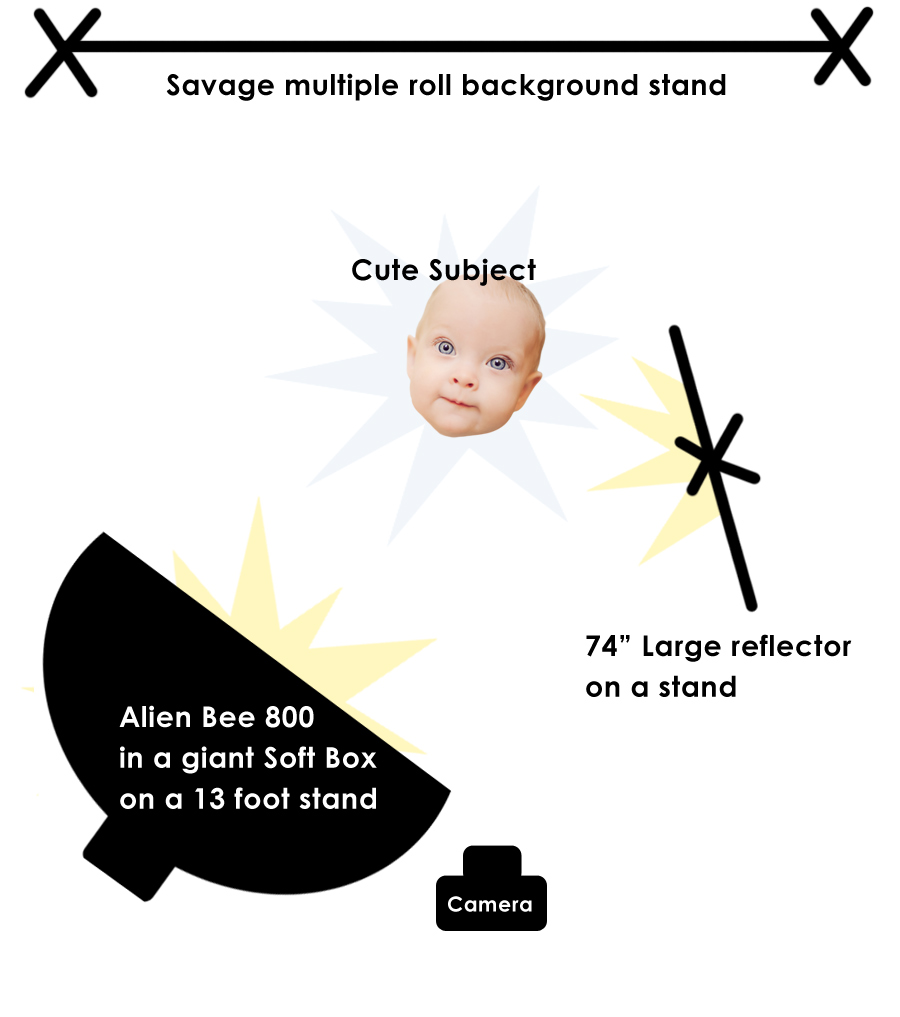
Here is a little diagram showing a rough approximation of my usual set up:
The Gear
Alien Bee 800 Flash Unit ? The workhorse of the studio gear (and it’s pink!). I use the 13 foot air cushioned stand for mine. Positioned camera left. ETA: Shortly after writing this I set up a second light as a fill light camera right (an Alien Bee 400 in a slightly smaller soft box). Watch carefully to make sure a fill light is kept at a lower power than your main light and have it angled in a way that you are still getting some good dimensional shadows so your lighting doesn’t look flat. A good place would be opposite your main light and slightly behind the subject, while leaving the reflector in the same spot).
Giant softbox for my AB800 – (30″ x 60″) with speedring attached. Produces a lovely, natural soft light.
CyberSync Receiver (connects to your Alien Bee strobe) and Trigger (mounts on your camera’s hot shoe) – These allow your camera to talk to your Alien Bee and trigger the flash when you shoot. 🙂
Impact 74″ White Reflector (positioned camera right)
I see the one I use is out of stock, but the LiteDisc Oval Reflector would also work well. I use a cheap light stand that I absolutely hate and have to weight down with a pillow to keep it from toppling over. I would recommend something like this Manfrotto boom stand instead.
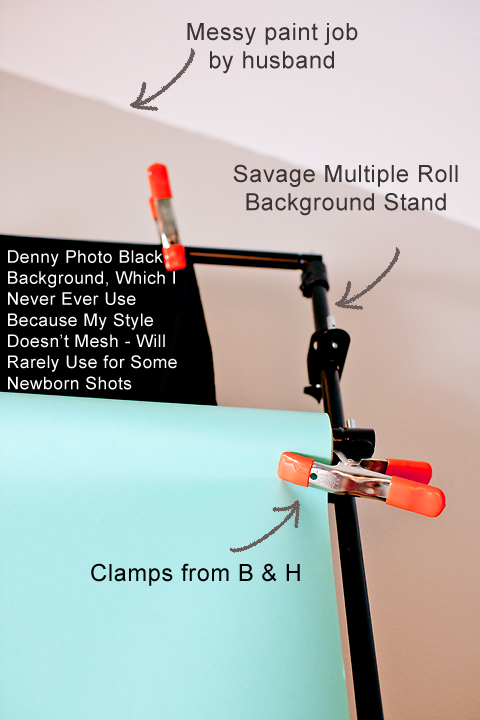
Savage Multiple Roll Background Stand System – I love being able to keep multiple rolls of paper or fabrics up at one time.
Sekonic L-358 Flash Master Meter – for metering light and getting a perfect balance and exposure. I also take test shots and check my histogram (using a PhotoVision Digital Target).
Savage Seamless Background Papers – An integral part of my studio puzzle. I love my Savage papers. I have a rainbow of colors on hand, if it gets dirty or ripped I can just roll more out, they aren’t a big investment so if I want some fun, trendy colors I can do that without worry, and I like the nice, clean look they give. I also love making them my own with some added texture since they are a perfect background for adding pretty textures to, giving it a look that fits with my style. I use pony clamps to hold the rolls to my baseboard and on the actual roll to keep it from rolling out too far (and those clamps are endlessly useful on all types of sessions). I have mostly the 107″ rolls. The 53″ rolls are okay if you are working with a newborn or single subject … or a very close pair of subjects that don’t mind squishing together and staying still. However, many of my little clients love to be wiggly and silly, and I totally encourage that for the type of work I do. So, I like the freedom of the 107″ width.
Flooring and Baseboard Trim – I purchased a 10 foot strip of white baseboard from my local Lowes and just roll my background paper down to meet the baseboard, clamping it on both sides with the pony clamps. My flooring is also from Lowes. It’s a special order, but fairly ordinary, laminate faux wood. We purchased a giant piece of plywood and laid the click together faux wood flooring on top of the plywood for stability. I choose this one because I liked the dark, rustic look of it. I just clicked it together on top of the plywood … I didn’t want it to be permanently attached in case I wanted to change it out or move everything in the future. The dimensions of the flooring are 8.5 feet wide by 7 feet deep (not leaving a lot of room for me when pulling my subject off the backdrop at least 5 or 6 feet … many experts recommend 6 or 7 feet).
Manfrotto 222 Joystick Head and Manfrotto 058B Aluminum Studio Pro Tripod – I absolutely adore this tripod … it’s very intuitive and superbly made, but I find myself rarely using a tripod in the studio because I have to be quick with the kiddos. I do love using it on outdoor shoots though.
So, I will leave you with the pull back shots now and you can make yourself feel better about your own messy studio when you see what a disorganized jumble mine is. Note that my light position is usually different, like the diagram, but we don’t want everything to be out in the middle of the room so I only pull them out when shooting. For the second in this series of Studio Spotlight posts I will dish out all the details on my props and answer some reader’s questions that have been sent to me. If you have a question you’d like to see possibly featured in a future installment of the studio series, you can send it to [email protected]. And if you found any of this information helpful, I would greatly appreciate it if you shared it with your photographer friends.
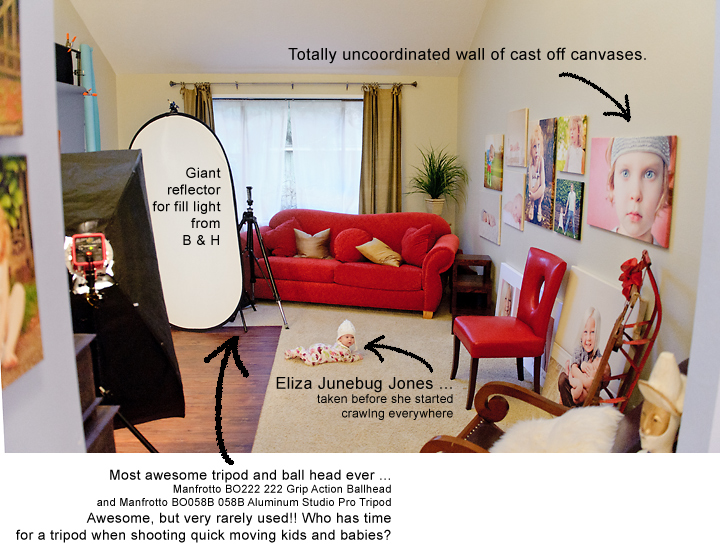

The distortion is from the wide angle lens, my canvases aren’t actually all crooked and wonky … a mish mash, for sure, but they are at least straight. 🙂
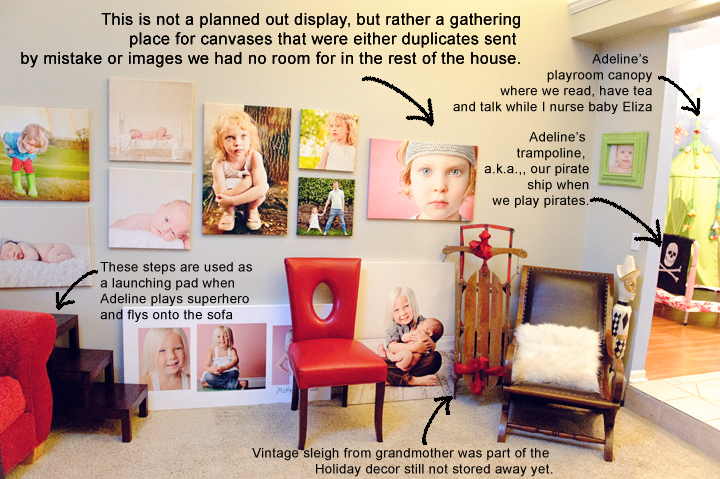
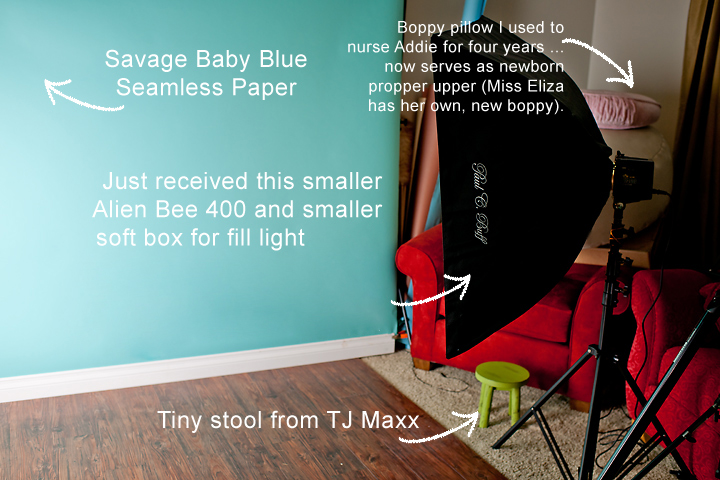
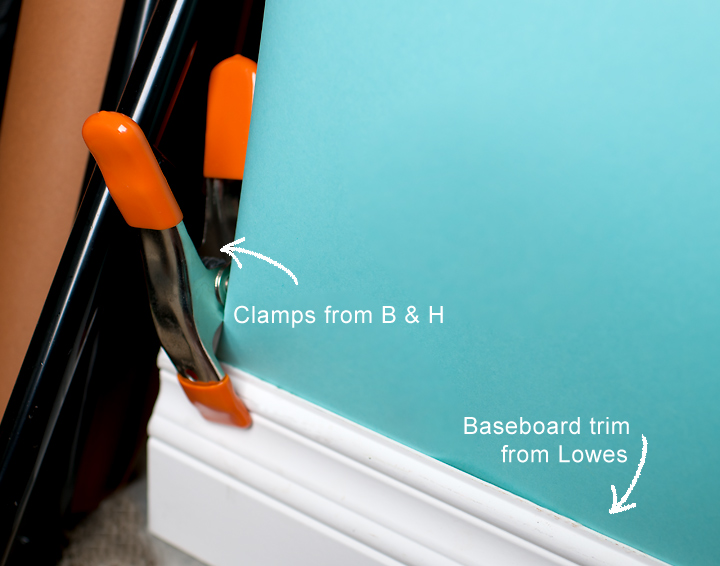
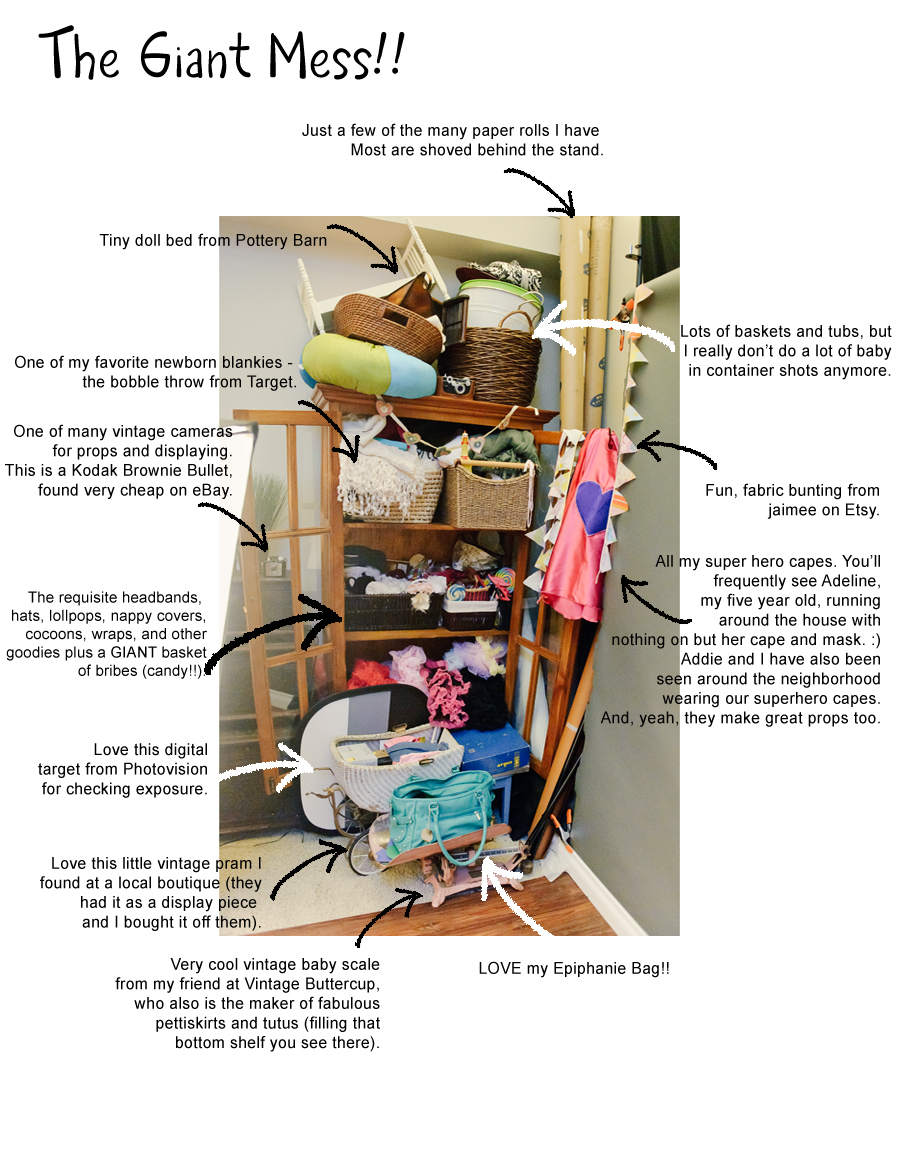


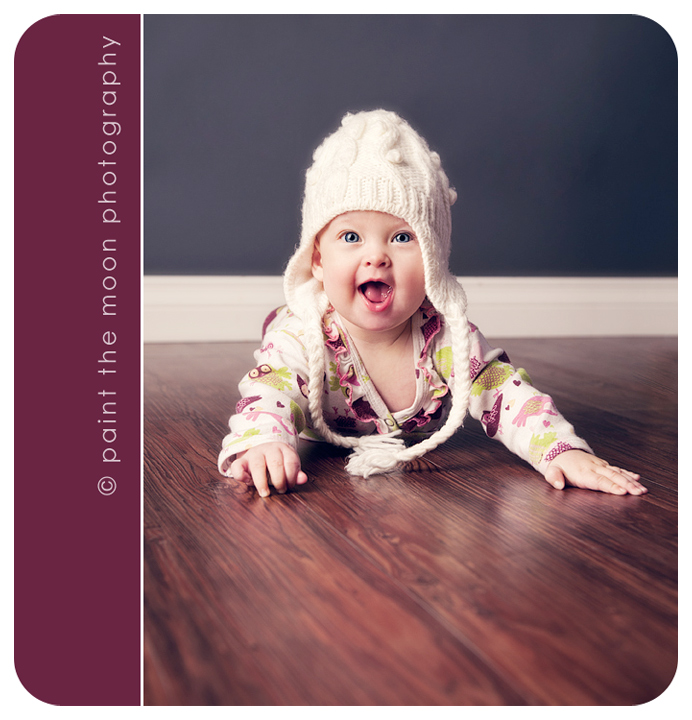
And one of my little Junebug after I was finished taking pictures of the mess … proof that you don’t need a super fabulous studio to take great shots:
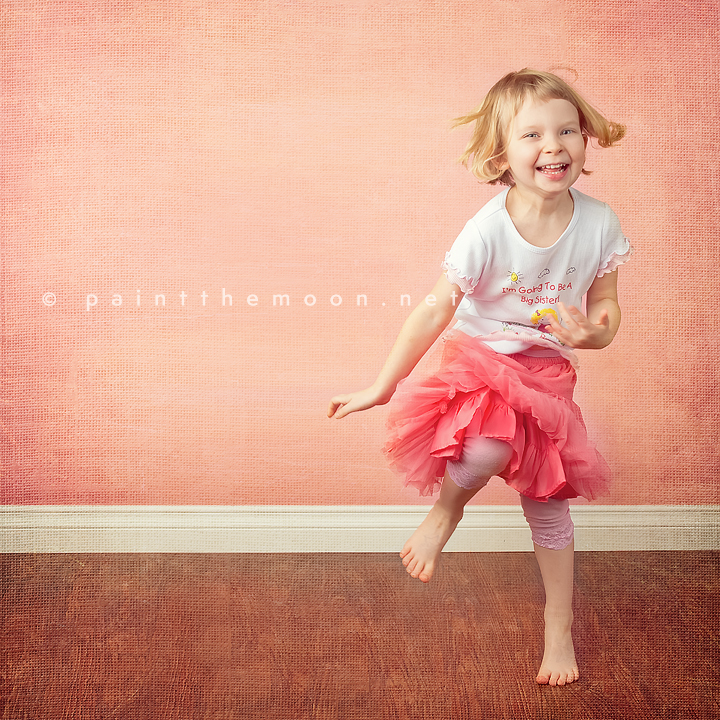
And one of my favorites of my little girl in the studio. This is another reason why I love having the studio in my home – spur of the moment photos with great lighting can be taken any time. Addie was showing me her “Big Sister Dance” here and I asked her to show me on the “dance floor” so I could capture the moment (we had just found out I was pregnant and she was VERY excited). It was late in the evening as well as freezing cold and raining outside to boot – so this would have never been captured without my little studio. 🙂


Thank you so much for this! I have been having lighting issues in my home studio, I just purchased a soft box so I will now be investing in a reflector. Glad to have some ideas to try!
Wow! Annie thank you so much for showing this. Not only is it great to see how you work, but it’s super encouraging to know that I don’t need a “fancy pants” studio to do great in-door work. I long to do shoots during the dreary winter months as well but wasn’t sure if my home-studio would be deemed “professional.” Thank you for sharing!!
Thank you so much! I have been so scared of all the lighting equipment and thinking that it wouldn’t mesh with my style either, but I love how you make it all look so natural. I do have one question though…..what is that wood-looking flooring? and where did you get it?? THanks for all the helpful info!! 🙂
Thanks, Kerry! I’m glad you found it helpful. 🙂 You can find the flooring information under the Flooring and Baseboard Trim subtitle. 🙂
Annie, you are simply the best… You amaze me every time! Always look forward to learning with you! <3
Thanks so much Annie– I do have a question on your flooring— did you adhere it with a flooring adhesive to get it to stay or did you just click it all together and leave it on the plywood? Thinking my hubby may have a weekend project!! 🙂 Also– Do you have the dimensions of your flooring?
Hi, Tori! I just clicked it together on top of the plywood … I didn’t want it to be permanently attached in case I wanted to change it out or move everything in the future. The dimensions of the flooring are 8.5 feet wide by 7 feet.
Wonderful! My husband and I have been looking at the alien bee! We started using a reflector alone outdoors and I can’t believe the difference it has made in our photography already.
Thanks so much for this Annie! It really helps. Its great to see the set up used to get such amazing images.
Thank you SO much for this! I cannot tell you how much it has helped this newbie 😉
GREAT post, Annie! I think a lot of new-ish photographers are intimidated by studio lighting but, really, it’s vital so that one is not dependent on weather. I’ve been gently recommending studio lighting to my followers, too. LOVE my Alien Bees 800 but mine’s black, not pink 🙁 as hubby and I share. 🙂 We just bought and installed industrial shelving for all my props which threatened to engulf the house. Anyway, thanks for posting this and encouraging others to expand their skills. xo Georgianna
So awesome!!!!! I thought you had a natural light studio but this is so much better for my needs :). Yay me! Thanks for the guide.
Thanks Annie!! I feel a trip to Home Depot coming over me…
Oh Annie…this is such a fantastic post!! Love you for it 🙂 I posted it on my own photography page on Facebook. I know there are many photographers out there wondering what it takes to set up a home studio. Hope you are doing well! xoxo Tasha
Thank you for sharing this setup. You are an inspiration. Keep up the great work.
Thanks Annie for all this information. It is so helpful!! I am still learning and have recently been looking into diffent types of backdrops. I love the seamless look of how your backdrops looked and have been wondering what you have been using. This is so helpful because I was wanting some solid color backdrops that way I could add my own textures to them if I wanted to change them up!! I just wondered what size backdrop that you would recommend getting because there are several sizes on their site.
Wonderful…thank you!
Wow, what a great read! Thanks so much for the info, Annie! Oh, and it makes me feel better that I’m not the only one with overflowing props and storage–hee! hee! : )
Thanks so much for sharing, Annie 🙂
I just received my alien bees yesterday (hot pink, too ;)and I’m so excited to try them out.
This helps alot with giving me an idea of settting everything up!
Awesome, awesome post! Proof that a whole big fancy expensive studio isn’t necessary to produce beautiful work! Yay! Thanks so much, Annie.
Thank you sooo much for sharing! Loved the setup, simple enough but very effective…just added a few items to my gear list..lol. Great work!
Great tutorial! Very helpful!
Annie, THANK YOU! From the bottom of my heart! It’s so nice to see that it’s possible in a small space and to still produce such gorgeous photos. As someone who is just learning to better my photography, this is invaluable to me. Thank you, thank you, thank you!! 🙂
Thanks Annie!
I did a full garage conversion a few months ago. I just moved into studio shots for winter and newborns. I finally got strobing down and now will play with that reflector. I also had an adversion against the plain paper but you have inspired me to retry it.
THANK YOU, THANK YOU, THANK YOU!!! My home studio is also a small space, and it is nice to know that it IS workable, even if not ideal. I have been thinking about buying the seamless paper backgrounds. Appears to be a great investment. Do you mind if I ask, what width seamless paper do you buy? (the 107″, or the 53″)
Thank you again,
Katy
Hi, Katy! Thanks for the kind words. 🙂 I have mostly the 107″ rolls. The 53″ rolls are okay if you are working with a newborn or single subject … or a very close pair of subjects that don’t mind squishing together and staying still. However, many of my little clients love to be wiggly and silly, and I totally encourage that for the type of work I do. So, I like the freedom of the 107″ width.
This is the ultimate! Thanks so much. I am in the process of setting up an indoor studio even though I love shooting outside. You make it look so easy and affordable. I can’t wait to get my studio finished. Thanks again.
Thank you!
That was so interesting,you certainly know how to make things work for you,as your photos are always Beautiful works of art.Loved having a sneek peek into your life,thankyou!
WOMDERFUL thank you so much… oh to find some good suppliers in the UK though. sigh. will be buying some flooring and skirting this week… LOVE how you connect the paper to the baseboard. simple but genius as the best things always are.
Thank you so much for this wacky, yet helpful post! I never thought I would be able to do indoor “studio”-ish photos. But you gave me some awesome and tear-downable ideas. You’re awesome!
Thank you so much for sharing this great info! I’m trying to get my own studio set up as living in SD we too have long winter months. It was so helpful to see your setup, space and equipment you use.
Thank you so much for this. I am sure you are busy but this really really helps!!!!! You are so so kind to post and help others like tis.