Aspect Ratio, Cropping and Your Photos

Aspect ratio, cropping and how it affects your photos.
Ever have an image that is oh so perfectly framed – you go to place an order for an 8×10 of said beautiful print and then find out that you will lose an arm or leg with that chosen size of print? How did this happen? It’s all about aspect ratio. What is aspect ratio, you ask?
Aspect Ratio is simply a measurement of a photograph?s width to height. The aspect ratio for 35mm cameras, film or digital DSLR’s, is 3:2. This means that the long side is 1.5 times as long as the short side. This aspect ratio will produce 4″ by 6″ prints. Most professional photographers I know won’t offer prints in this small size, so let’s take our perfectly framed image and go up another standard size – the classic 8″ by 10″ print. Oops! You may have just chopped off an arm! Why? Because the aspect ratio of a 8″ by 10″ print is 5:4.
You might ask, “How did I lose part of my image if I actually went up in size?” If you take that image with the 3:2 ratio and print it in a size like 5×7 or 8×10, your ratios are different than your 3:2 ratio (the 4×6 format). The 4×6 image’s long side is 1.5 times as long as the short side, while your classic 8×10 print size has a 5:4 ratio … which means the long side is only 1.25 times as long as the short side (so it’s fatter). No matter how much you go up in size, the 3:2 ratio (4×6 size) is going to always stay narrower than the 5:4 ratio image (8×10). So, when you print an 8×10 you will *always* be cropping two inches off your photo if your camera’s sensor is a 3:2 ratio (almost all of you reading this will have a 3:2 ratio camera sensor – the exceptions are point and shoot cameras which usually have a 4:3 ratio, some high end professional cameras use a 4:3 aspect ratio and some cameras let you choose from multiple aspect ratios).
I like to look at the multiplication factors (such as the long side being 1.4 times as long as the short side for a 5×7) instead of the actual ratios (like 5:4) because it’s a little easier to remember.
In order to take the image your camera produced at a 3:2 aspect ratio and print it in a size that has a different aspect ratio you’ll need to crop part of the photo off. For an example, going from a 3:2 ratio (4×6) to an 8×10 size (which is a 5:4 ratio), you’ll need to crop off two inches. This is why it’s so important to understand this concept – so your final product is printed just the way you intended, and not with part of Susie’s arm missing. If you don’t crop your images before sending to print (or giving them to your clients if you provide digital files as a service), the printer will often choose for you just how your image is cropped and you may end up with vital parts of your image chopped off or white borders on two sides of the photo to make up the difference. Most pro labs use an ordering system like ROES that will have a preview for you to position your image for the crop you desire, but it’s still important to learn this concept for a number of reasons.
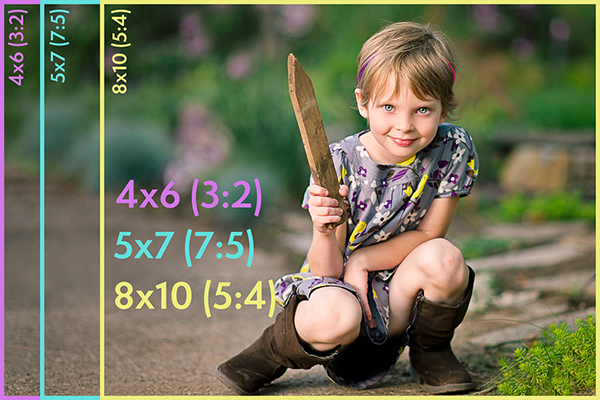
Confused yet? Let’s break it into a handy little chart and include a photo reference as a guide to help you visualize it better.
![]()

![]()
And now let’s look at how actual aspect ratios and different sizes would end up cropping an image:
![]()
And finally how we would use the crop tool to change our aspect ratio:


![]()
![]()
![]()
You’ll want your prints to have the highest resolution possible, so just leave the resolution field in the options bar blank when cropping. You will need to sometimes crop the image to fit the aspect ratio of a print size ordered, but the resolution should be left alone unless you are resizing for web or blog use. Also, of course, always be sure to save your cropped image as a copy … this is pretty obvious, but you never want to save over the top of your original image.
And the big question is, “How do I avoid having to crop part of my image off when ordering certain sizes?”? The answer is simply to shoot “wider” … leave some breathing room when you are shooting. When you do this, you’ll make sure that no part of your subject will be cut off when you have a print made that isn’t the same aspect ratio as your camera’s sensor. This is especially important with client work. When your client falls in love with an image and wants to order a 16×20 print (because they already ordered the frame for a spot on the wall and that spot just happens to fit that size print perfectly), you certainly don’t want to be stuck explaining that it can’t be ordered because you didn’t leave enough room when shooting. Personally, it took me awhile to get used to shooting like this because I love unusual crops and tight framing and like to do my cropping in camera. But I had a session or two where my tight crop got me into trouble because I didn’t have any wiggle room for ordering prints in different aspect ratios. So, let your subjects breathe a little in the frame, use the handy chart above and you’ll be fine! Feel free to share with your clients as well so they better understand why the image they are ordering may be cropped slightly differently depending on the size of print they order.
Look for more in this print series next week as I introduce the company I trust with my prints and canvases (ahhh, how I love canvases!! I’ll show off some of my personal wall displays full of pretty canvases) and I will share an extra something special with everyone. I’ll also be doing some print comparisons and talk about print quality, calibration, advice for photographers who sell digital files and more! So stay tuned!

Very useful post. Question how do you recommend giving clients digital copies? As in if I crop the photo for a 3:2 aspect ratio but they choose to take the image and print as a 5:4 or 7:5 the image may get cropped in a way that is less pleasing. So should you give digital copies cropped to the most common ratios? That is a lot of editing. Or just leave it at their discretion?
Hi, Jennifer! I’m actually going to cover those points and give a few tips for creating digital files for clients in the next installment of this series. If there is any other points you would like to see covered, comment back here and let me know! 🙂
Thank you so much for this! I look forward to next weeks post.
Awesome post, thanks!! If my camera DOES have multiple choices for aspect ratios, which should I set it to?
That’s just personal preference, I suppose. However, unless you are using a very high end professional camera like a Hasselblad, if your DSLR has multiple options it is most likely simply cropping in camera for you if you choose 4:3 versus 3:2 – you’re not actually getting more pixels/information. So, if you think you’ll be ordering more large prints with that aspect ratio (4:3) then you might choose that setting, otherwise I would just stick to 3:2 so you have that extra information in there should you need it (because if you do decide you want a 3:2 ratio print you’ll have to crop yet again and end up with less resolution than you would have if you had simply shot it with 3:2 to begin with). Confusing enough? LOL!
Thank you so much for this post!! It’s like you just posted this for me, as I am discovering this issue this WEEK! I look forward to your future posts in this series. Thanks for all that you do!!!
In the photo of your daughter, you were able to crop the image and still maintain “the rule of thirds.” My question is: If you were framing this portrait, the frame would probably cover part of her head and her boots. Would you shoot even wider to have some extra white space over her head and under her feet? This always confuses me.Thank you for your information.
Hi, Deb! This was purely for an example and the SOOC shot is much wider than shown in this blog post … http://paintthemoon.net/wp-content/uploads/2011/09/pirate-sword-addie-soocbanda.jpg. And when photos are professionally framed, the frame usually does not overlap much of the image, if it does at all and many times they will be matted with no loss of image at all. I do like to have breathing room around the head and feet just for composition’s sake and for the option of gallery wrapped canvases (one of my addictions, LOL). 🙂 Hope that helps!
Thank you so much for this post, so very helpful, I very much appreciate all your helpful hints:) You are an inspriation!
This is the best explanation of aspect ratio’s I have read! This really helped turn on a light bulb for me, thanks so much, and I can’t wait for the next installment 🙂
Hi Annie,
Just to start, I’m guessing that I’m not one of your typical readers or part of your usual target group. I’m hoping you don’t mind a question from me anyway. Photography is definitely just a hobby for me and 99.6% of my prints are 4×6 inches for photo albums. Even though they’re pretty much just for me, I try to make my pictures look the best that they can.
I more-or-less use the Bruce Fraser multiple-rounds-of-sharpening method for sharpening my pictures. All that I’ve read on that method says that the final round of output sharpening should be based on the size print that you want and resolution (in terms of dpi) of the output device. The place I send my pics to uses a contone printer with a print resolution of 300dpi. Based on this, for my very last steps for 4×6 prints, I’ve been resampling the working copy of my image downward to 1800×1200 pixels at a ppi of 300 pixels/inch using the crop tool in Photoshop, then doing my final sharpening with the Photokit sharpening plug-in set to Contone, 300 (dpi). After reading this, I’m wondering if I need to change what I’m doing. Am I better off to just resize the image to 4×6 and let the ppi fall where they may? When I was playing around in photoshop tonight, the images from my (way) older camera worked out to around 338 ppi, but the ones from my newer camera came out to nearly 667 ppi. That seemed like it was possibly overkill for a device that only prints at 300 dpi.
I’m so confused (and possibly way overthinking all of this)!
You are truly appreciated!!!!!! This is just perfect. This is the part that I am so totally confused about so I am going to read and reread this!!!!! Thank you so much!!!!
THANK YOU SO MUCH. I spent ALL weekend “googling” this as I knew I had “learned” somewhere way back when…but subsequently lost it! I had somehow mistakenly gotten the idea that a FX sensor would resolve these issues. Since I am an amateur hobbyist photographer, I was having a very hard time considering going up to an FX format ($$$$) for my needs. Looking forward to more posts on the same.
Thanks for the help! This subject has always confused me and you explain it in very easy language.
Reading this was so timely as I was in the local photo studio asking about getting professional photos printed. The man told me just to make sure to crop them to the size I wanted printed and I was having a hard time understanding what he meant… Now i get it! 😀
This was a great post and very timely for me as well – I’ve had an extremely hard time figuring this out and how to upload to Zenfolio for my customers but I am definitely going to follow your next posts for the series. You are a very talented photographer as well as teacher and I enjoy following your blog. Thanks for your information! 🙂
Thank you so much for this. I just had this issue last week! This is the best explanation I have found. Your willingness to share your knowledge is, as always, greatly appreciated.
I’m new & was lured-in by your amazing actions!! However, frustrated & hesitant to purchase actions bcuz last week two separate pro labs told me to choose color correct. Even to my dismay of telling them I have a calibrated monitor, they still insisted! *sigh* I thought maybe it was best for skin tones however the creativity within my images would also be ‘corrected’. So, I held off my clients’ prints, searching the web in hopes of the answer that I wanted. YOU’RE A BLESSING!!! I have read 18 books, paid for webinars, tutorials, & attended classes YET YOU ARE THE 1ST PERSON THAT EXPLAINED THE ASPECT RATIO & COLOR CALIBRATION PROCESS TO ME CLEAR AS A BELL!!! You are an incredibly, artistically gifted person with your photography BUT…. You take it to a whole, new level by blogging TO HELP OTHERS!!! I can not wait until I get my actions ordered tomorrow/Wed from you, as well as subscribe to your blog as soon as I hit send on this;) May God Bless You With Everlasting Creativity!!!!
I would love to see the post you refer to in the reply to Jennifer Vitotoe about digital files. Can you share that link.
How wonderful that you did this tutorial. It will most certainly be something I refer to and have searched for this many times. You made my day x Thank you
Thanks so much for this post. I have a question in regards to the sizes of canvases….How do I ensure that i have enough space to be left for the canvas to be wrapped around the frame (1.5 in or 2.5 in)….? do i have to resize the image in some way? I have been getting into trouble with my clients (like you mentioned up top) because the image they wanted in canvas did not work because too many important parts would be cut off….what is the solution here? thanks so much. nadine
Thank you for sharing these useful tips!
Is it possible for you to give your opinion on selling digital files in general: with against, and if yes how to price them?
Thank you SO much for this explanation and numbers, too. So, if I have a Canon S95, and it offers several ratios in which to shoot, I should “shoot” for the 3:2 as a standard setting? I have gotten myself in trouble putting it on some odd ratios. One of my fave shots I shot with an odd, long ratio and also shot it too tight, and then had no room to crop in a print size I wanted! Dang it. I have just never been sure WHICH ratio to pretty much stick with. I do like to print 5×7 and 8×10, especially. Any thoughts? QuirkyKim
Hi Annie! This is so helpful, thank you so much!!! That cheat sheet is awesome 😀
One question though… if I crop 5×5 but they print 20×20 there should be no quality loss? it’s about the aspect ratio, am I right?
Hello! I love this post! I’d love to see the link to the follow up where you talk about tips for creating digital files for client, the next installment of this series? Thanks so much! 🙂